Organising the shift patterns of your workforce can be challenging, with many businesses having staff working varying schedules that may change from week to week.
Most companies rely on old–fashioned techniques when it comes to assigning shifts, using whiteboards, pen and paper or spreadsheets, none of which are dynamic, easily accessed or shared.
A considerable amount of time can be saved, and miscommunication avoided, by digitising your schedule management. This is just one digital transformation that Microsoft 365 can help you achieve.
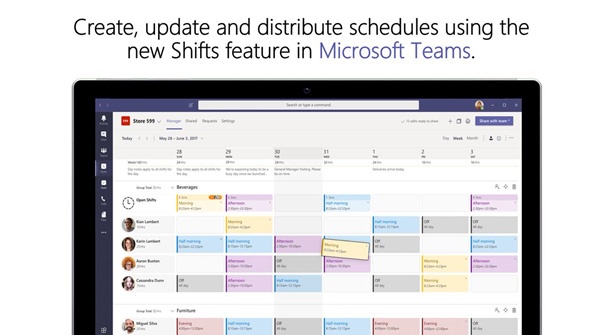
The go-to application to solve the challenge of rota management is Microsoft Teams. A relatively new addition to the Teams platform, Shifts allows you to create and manage your rota schedules as you see fit, and enable your staff to access their live work schedules anytime, whether at work or on the go.
Set up Shifts within Microsoft Teams

Setting up Shifts in Microsoft Teams is as easy as 1, 2, 3:
- Open Microsoft Teams, and click the ellipsis on the left of the screen, then click Shifts or click and drag the Shifts icon over to the sidebar for easier access in the future.
- Click on the Shifts icon and it will take you straight to a create team schedule page. To create a schedule, you must first have a group of staff organised into a ‘Team’ and be the owner of that Team.
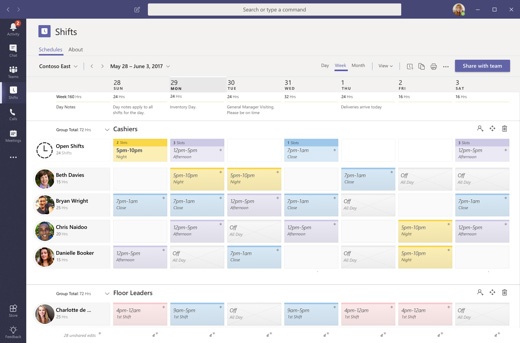
- Click create on your team, pick a time zone, the closest city then click confirm and you’re underway. The layout is straightforward, with the days of the week at the top and your employees on the left-hand side of the page.
Now you’re ready to set up your first schedule.
People-centric shifts
Set up your schedule
As an employer having staff with different roles working under you is a given. That’s why Shifts allows you to separate employees into different categories according to their role.
By default, when Shifts loads you have an unnamed group waiting for you. Pressing the ellipsis next to the group will let you rename it according to the relevant role. Navigate to the top of the page and add as many groups as you like according to the different roles you have in your business.
Now you need to add some of your staff members to these groups – click ‘add people’ on the right and add as many employees as you would like to that particular rota.
Building your schedule
It’s time to start scheduling your team’s shifts. Clicking box by box, you can change shift length and date, even assigning 24 hour shifts for on–call staff if needed.
There’s no need to start a shift schedule from scratch every week. Once your schedule is written up, you can go to the top of the page and click ‘copy schedule’, then simply paste it for as many upcoming weeks as you like, to avoid you having to go back and re-write it every time.

Keeping a rota neat and tidy, but still containing relevant information, can be difficult to maintain, since circumstances change daily. But this is a problem that Shifts has already solved!
‘Add activities’ allows you to assign a colour to an activity throughout the day making it easy to keep track of what your staff are doing, and assign tasks as and when you need to.
Staff can become familiar with the colour of different activities helping them keep up with the activities taking place on different shifts throughout the week. This can help them keep track of changes that may occur at a moment’s notice, and revolutionise the way you communicate with your team.
You’ll also be able to keep some time slots open to show staff which shifts need covering or filling, allowing them to request time off, or claim one of the open shifts by using the request option at the top of the screen. This eliminates the need for having to personally contact staff to cover a shift, and reduces the risk of you or any staff member missing important details because they didn’t have an up to date rota.

Time management with Shifts
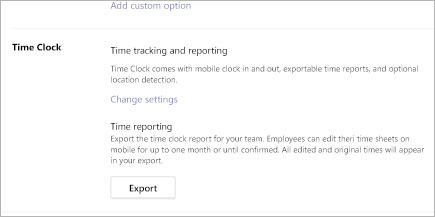
Keeping track of your employees’ arrivals and departures can become a real issue in the work place, particularly when it starts to affect payments and profits. But ‘Time Clock’ time tracking and reporting will solve this problem for you.
To get started click ‘Begin setup’. This opens the time clock setup. Select the option to include location detection for mobile app, and input the coordinates of the location you want them to clock in from. This way the app will only allow them to clock in when within range of that location, avoiding staff clocking in when not actually in the building yet. You can even press export to see when staff arrived, left or had breaks.

Share information with your team
The Shifts tool’s functionality goes beyond simply helping with scheduling and keeping track of when staff have arrived for their shifts.
Have something important or urgent that you want your team to know? Want to make sure that they remember an instruction? This is where ‘Day notes’ comes in.
In the top right of your Shifts page you can click day notes, which will bring up the option to ‘add a note’ for the groups you have created. Then simply enter the information that you need to convey, and your group will be notified.


